
Installing a boat lift canopy frame kit is one of the most practical upgrades you can make to protect your boat from sun, rain, and storm debris. Whether you ordered a supply kit for a DIY project or you just want to understand what the installation process looks like before hiring a crew, this guide walks you through everything from preparation to final adjustments.
Request your free estimate if you would rather have a professional team handle the installation from start to finish.
What You Need Before You Start
Before you pull any parts out of the box, take a few minutes to confirm you have the right kit and the right conditions for installation. A little preparation now saves hours of frustration later.
Confirm Compatibility with Your Boat Lift
Not every frame kit fits every lift. The inside width of your boat lift, the beam spacing, and the height clearance all play a role in determining which frame kit works for your setup. If you have not already verified this, use our canopy compatibility guide to make sure your kit matches your lift before you start drilling or bolting anything down.
Tools and Materials Checklist
Most canopy frame kits come with all the structural hardware you need, but you will need a few common tools to complete the job:
- Socket wrench set (standard and metric sizes)
- Adjustable wrench
- Power drill with a socket adapter
- Tape measure
- Level
- Marine-grade thread locker (recommended for saltwater environments)
- Safety glasses and work gloves
- Ladder or step stool rated for dock or marine use
If your kit includes an I-beam frame design, the components may be heavier than standard tube frames. Plan to have at least one helper for lifting and positioning. For a closer look at the differences between frame types, read our comparison of I-beam vs. standard tube frames.
Safety First
Working around water and heavy metal components comes with real risks. Keep these precautions in mind throughout the entire process:
- Never work alone. Have a second person available to hold components, hand tools, and call for help if needed.
- Wear closed-toe shoes with non-slip soles on the dock.
- Check the weather before starting. Avoid installation on windy or stormy days.
- Keep the dock surface clear of loose hardware, packaging, and tools when not in use.
- If your boat lift is motorized, disconnect the power source before working near moving parts.
Step-by-Step Installation Process
The exact steps will vary depending on your frame style and lift configuration, but the general process follows a consistent pattern across most kits. Here is a breakdown of each stage.
Step 1: Unpack and Inventory All Components
Lay out every piece from the box on a clean, flat surface. Match each item against the parts list included with your kit. You should see:
- Vertical uprights (posts that attach to the boat lift beams)
- Horizontal bows or rafters (the arched pieces that span the width)
- Ridge pole or center beam (if applicable to your frame style)
- Baseplates, clamps, or mounting brackets
- All bolts, nuts, washers, and fasteners
If anything is missing or damaged, contact the manufacturer before proceeding. Trying to improvise with mismatched hardware can compromise the structural integrity of the entire frame.
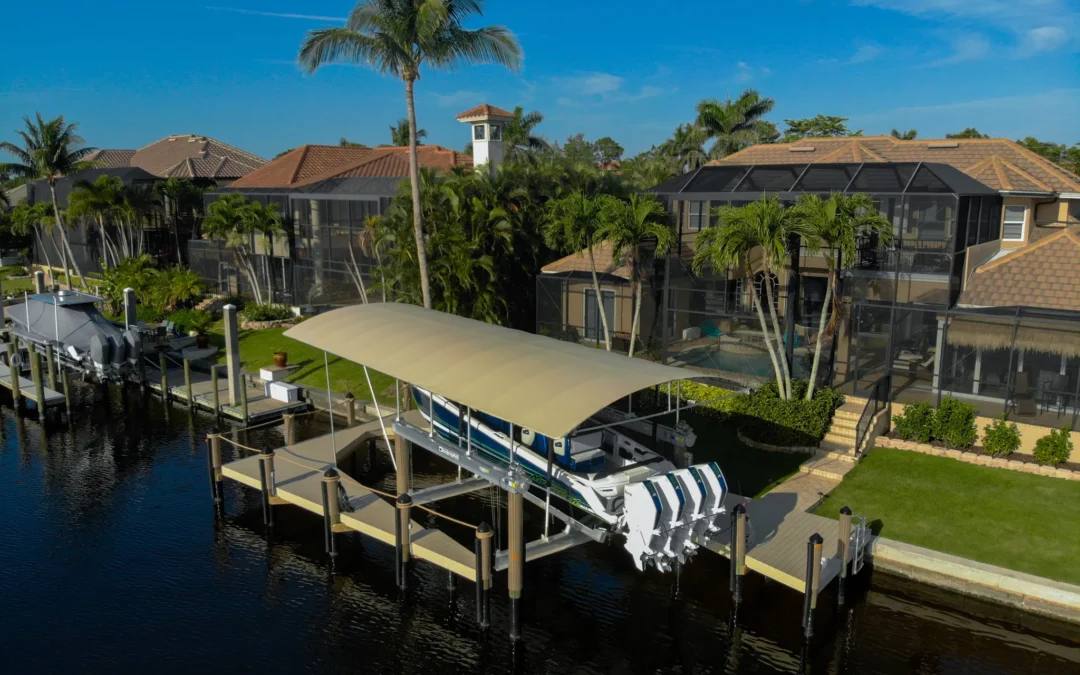
Step 2: Attach the Baseplates to Your Boat Lift
The baseplates are the anchor points that connect the canopy frame to your existing boat lift structure. Position each baseplate on the lift beam according to the spacing dimensions provided in your kit instructions.
For most installations, you will have four baseplates per side. This is more than the industry standard of two to three per side, and it distributes the load more evenly across the lift beams. That extra stability matters during high winds and storm season in Florida.
Use a tape measure to verify even spacing on both sides. The baseplates on the left and right must mirror each other exactly, or the frame will sit unevenly and put undue stress on both the canopy and the lift itself.
Step 3: Install the Vertical Uprights
Slide each vertical upright into its corresponding baseplate. Most kits use a pin-and-bolt system or a sleeve-and-clamp design to secure the uprights. Finger-tighten the bolts at this stage so you can make small adjustments later.
Use a level on each upright to confirm it is plumb (perfectly vertical). Even a small lean at the base gets magnified at the top of the frame, which throws off the entire canopy alignment.
Step 4: Connect the Horizontal Bows and Rafters
With all uprights standing, begin connecting the horizontal bows or rafters across the top. Start from one end and work toward the other, attaching each bow to the uprights on both sides before moving to the next one.
Pay attention to the rafter spacing. Closer rafter spacing reduces stress on the fabric cover once it is installed, which means fewer sags and a longer cover lifespan. Quality frame kits are designed with tighter spacing for exactly this reason.
If your kit includes a ridge pole or center beam, install it after the outermost bows are in place. The ridge pole provides additional rigidity and helps the canopy shed water instead of pooling in the center.
Step 5: Check Alignment and Level the Frame
Before tightening anything to final torque, step back and inspect the entire frame from multiple angles:
- Are the uprights vertical on both sides?
- Are the bows level and evenly spaced?
- Does the frame sit symmetrically over the boat lift?
- Is there adequate clearance above your boat (including any T-top, Bimini, or outriggers)?
Make any necessary adjustments now while the bolts are still finger-tight. Once you torque everything down, repositioning becomes much more difficult.
Looking at different frame configurations? Browse all canopy frame styles to see how each design looks when installed.
Step 6: Torque All Fasteners to Specification
Go through every connection point and tighten each bolt to the torque specification listed in your kit manual. If your manual does not include specific torque values, follow this general guideline for marine hardware:
- 3/8-inch bolts: 25 to 30 ft-lbs
- 1/2-inch bolts: 50 to 65 ft-lbs
- 5/8-inch bolts: 90 to 110 ft-lbs
Apply marine-grade thread locker to each bolt before final tightening, especially if your dock is in a saltwater environment. This prevents the bolts from vibrating loose over time due to wind, wave action, and tidal movement.
Step 7: Install the Canopy Cover
With the frame fully assembled and secured, you are ready to stretch the canopy cover over the top. Drape the cover over the frame starting from one end, and work your way across. Most covers attach using a combination of:
- Bungee cord loops that hook to the frame
- Straps with buckles that wrap around the uprights
- Keder (a cord sewn into the edge of the fabric) that slides into a channel on the frame
Pull the cover taut and even on both sides before securing the final attachment points. A properly tensioned cover should have no wrinkles or sags. If you notice pooling areas where water could collect, adjust the tension or check that the frame bows are positioned correctly.
How Long Does Installation Take?
For a two-person team with basic tool experience, a straightforward canopy frame kit installation typically takes between three and five hours. More complex setups, such as I-beam frames with additional reinforcement or frames on unusually wide lifts, may take six to eight hours.
Professional installation crews with experience on dozens of lifts per month can usually complete the same job in two to three hours. The time savings come from familiarity with common lift configurations and pre-staged tooling.
Common Installation Mistakes to Avoid
Even experienced DIY boat owners run into trouble with canopy frame installations. Here are the most frequent mistakes and how to sidestep them:
- Skipping the compatibility check. A frame kit that does not match your lift dimensions will not install properly, no matter how creative you get with the hardware. Always measure your boat lift and confirm fitment before beginning.
- Working alone. The components are heavy and awkward. Trying to hold an upright in position while simultaneously bolting it down is a recipe for dropped parts and misaligned connections.
- Tightening bolts too early. Lock everything into final position only after the entire frame is assembled and checked for alignment. Premature tightening means you will have to loosen and readjust multiple times.
- Ignoring rafter spacing. If your kit allows adjustable rafter placement, resist the temptation to space them too far apart. Wider spacing puts more stress on the fabric and shortens the cover’s lifespan.
- Forgetting thread locker. Marine hardware vibrates and corrodes. Without thread locker, bolts can work themselves loose within a single storm season.
When Should You Call a Professional?
A canopy frame kit is designed for straightforward assembly, but not every situation is straightforward. Consider hiring a professional installation crew if any of these apply:
- Your boat lift is an unusual size or brand that requires custom modifications to the frame.
- The dock structure has damage, rot, or instability that could affect mounting.
- You are working with an I-beam frame system that weighs significantly more than standard tube frames.
- You need the installation completed quickly before storm season.
- Your HOA has specific requirements for canopy installation that require documentation or permits.
Coastline Boat Lift Covers offers professional measurement and installation across Florida. The team handles everything from the initial assessment through post-installation quality inspection. If you are not sure whether your setup is a good candidate for DIY, get a free estimate and let the crew evaluate your dock and lift in person.
Post-Installation Care and Maintenance
Once your frame is up and the cover is stretched tight, a small amount of ongoing maintenance keeps the system performing at its best for years.
- Inspect fasteners quarterly. Walk the dock and check every bolt connection. Retighten anything that has loosened, and replace any fasteners showing corrosion.
- Check the cover tension. Fabric stretches slightly over time, especially after heavy rains or sustained winds. Retension the cover and adjust straps or bungees as needed.
- Clean the cover periodically. Patio 500 vinyl-laminated fabric cleans easily with soap and water. Avoid harsh chemicals or pressure washers that could damage the waterproof coating.
- Prepare for hurricane season. In Florida, removing canopy covers before a named storm is standard practice. Coastline’s Hurricane Protocol handles seasonal removal and reinstallation so your frame and cover survive storm season intact.
For a full breakdown of care routines, visit our guide on how to maintain your boat lift cover.
Should You Buy a Supply Kit or a Full Installation Package?
This comes down to your comfort level with hands-on projects and your timeline. Here is a quick comparison:
| Factor | DIY Supply Kit | Full Installation Package |
|---|---|---|
| Cost | Lower upfront (no labor) | Higher upfront (includes labor) |
| Time commitment | 3-8 hours depending on experience | 2-3 hours (professional crew) |
| Tools required | You supply your own | Crew brings everything |
| Warranty | Covers materials only | Covers materials and workmanship |
| Best for | Handy boat owners, nationwide customers | Anyone in Florida wanting guaranteed results |
Coastline ships supply kits nationwide for boat owners who want to handle the installation themselves. Every kit includes the same marine-grade components used in professional installations: solid frames, Patio 500 fabric, and GORE TENARA thread. The only difference is who does the assembly. Review our full boat lift canopy frame kit guide for details on what each kit includes.
Frequently Asked Questions
Can I install a boat lift canopy frame kit by myself?
You can, but it is not recommended. Most frame components are heavy enough that a second person is needed to hold pieces in position while you secure the bolts. Having a helper also reduces the risk of dropping parts into the water or damaging the dock surface.
What size frame kit do I need for my boat lift?
Frame kit size is based on the inside width and depth of your boat lift. Measure the distance between the inner edges of your lift beams at the widest point. Then check the kit specifications to confirm the kit covers that span. If your lift is between sizes, go with the larger option to ensure full coverage.
How often do I need to replace the canopy cover?
A quality canopy cover made with Patio 500 fabric typically lasts five to seven years in Florida’s climate before needing replacement. The frame itself lasts much longer, often 10 years or more with proper maintenance. When the cover wears out, you can order a replacement cover without replacing the frame.
Do I need to remove the canopy before a hurricane?
Yes. Leaving a canopy in place during a hurricane risks serious damage to the cover, frame, boat lift, and even your dock. In Southwest Florida, most boat owners remove their canopy covers at the start of hurricane season and reinstall them afterward. Coastline offers a dedicated Hurricane Protocol service that handles this process for you.
What is the difference between an I-beam frame and a standard tube frame?
I-beam frames use a structural I-beam design (the same shape used in construction) rather than round or square tubing. This gives them greater rigidity and wind resistance. They weigh more and cost more, but they hold up better in coastal conditions where high winds are common. Read our full I-beam frame breakdown for a detailed comparison.
Ready to protect your boat? Request your free estimate or order a supply kit to get started on your canopy frame installation today.